Ownership verification of a blog or website is very important. If your blog or website is not a verified one, it will not affect its appearance in search results but there are a lot of other facilities which Google provides to the websites or blogs of which the ownership is verified. The process of ownership verification is very easy and a number of verification methods are available at Google web master website. You can use any of them and if you verify your blog or website ownership using more than one method, it will be an extra advantage. In the paragraphs given below I am explaining the method of your blog or website ownership verification using the ‘CName’ records –
The list of all your websites and blogs will be displayed like this-
Now click on the website or blog you want to verify. Here I want to verify the third one so I click on it. The next screen will appear like this-
 |
| Google webmaster site selection screen |
Now click on the gear icon in right hand side as indicated in the above image. A list of options will appear under the gear icon like this –
 |
| Google webmaster verification detail screen |
Now click on Verification Details as indicated above. The next screen will appear like this -
 |
| Google webmaster verification status screen |
As
I have already verified the ownership of my website and therefore the webmaster
tool has indicated that I am a verified user of this website. I still can verify
my ownership again using a different method. As I previously explained Google
provides a number of options to verify website or blog ownership, I can again
verify my website using another method which will add additional advantage, so
now I click “Verify using a different method”. The next screen will appear like
this –
You may like to read on - Windows 10-how toenable find my device feature
Now click ‘Domain Name Provider”, a list of all the domain registrars will be displayed as shown below. Please find your domain name provider and click on it. As in my case my domain name provider is “godaddy”, therefore I select godaddy.
 |
| Google webmaster Domain names provider selection screen |
 |
| Google webmaster verification Add a TXT screen |
Now the image already say’s that you can verify using godaddy.com verification in 3 easy steps. Now click on “Add a TXT record”, the next screen will appear like this -
 |
| Google webmaster verification Add a CNAME screen |
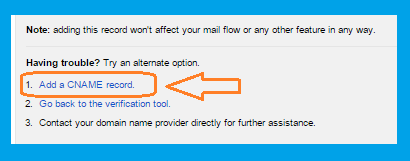
Now click on “Add a CNAME record”, your domain name provider will automatically display your ‘CNAME’ records like this -
 |
| Google webmaster verification Godaddy CNAME record screen |
You may like to read on - Add Google Custom Search to your blog websitefor better search results
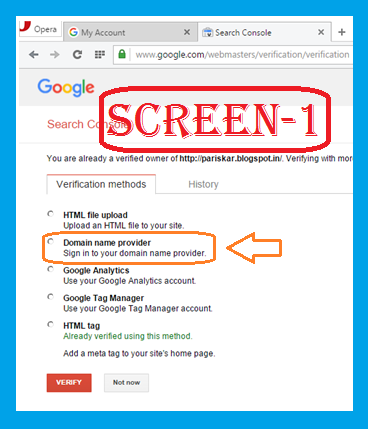
Now your screen mentioned at “Picture – 1” which is displayed above in the article, will finally be converted like the one displayed below because all the steps mentioned after the screen “Picture – 1” will take affect at “Picture – 1”. All the screens after “Picture – 1” are for the explanation purpose.
 |
| Google webmaster verification final screen |
Now as you are almost done, so please click “Verify”. Now you must receive the following congratulation message. If you don’t receive this message, you will be informed about the error in the process and rectify this and repeat the process till you get the following congratulation message.
 |
| Google webmaster verification Congratulations screen |
analytics, google webmaster tools, google-site-verification dns, verify domain ownership via dns record, google-site-verification meta tag example, How do I get my blog verified by Google, How do I verify a domain with a cname record, Feedback, google search console, google, How do I verify domain ownership on Google, How can you verify that you own a website in Google Webmaster


