How to verify your blogger custom domain ownership using Google’s Unique Security Token
When you purchase a domain name from a Domain Registrar and want to use it on your blog you will need to prove that you are the real owner of this domain name otherwise Google will not accept it on your blogger blog. Google has provided an easy system to verify the ownership of your domain using Google’s Unique Security Token.

How to use Google\s Unique to verify custom domain ownership
The verification may differ on the websites of various domain
registrars. The procedure to verify ‘godaddy’, a prominent registrar is given
below
Login to your blogger dash board
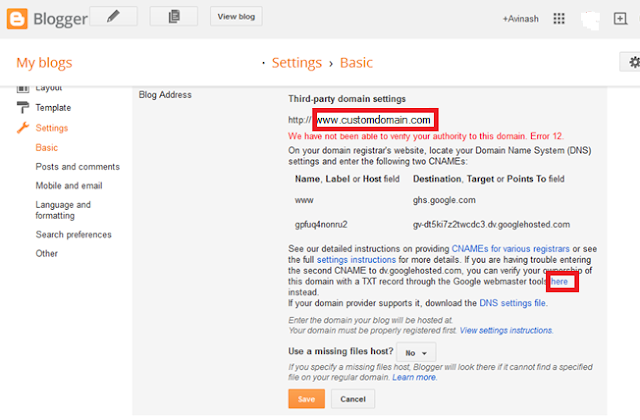
Click settings and select basic. The following screen will appear.
 |
| Blogger Settng Basic Screen |
 |
| Blogger third party domain screen |
Type your ‘Domain Name’ which you have already purchased just after ‘http://’. Please start your URL with ‘www’ because if you don’t type you will receive a message that naked domain names are not accepted.
Click ‘Save’.
You will receive an error message like the one given above –
Now in the above error message find the word ‘here’ as shown above and click it. Now you will receive a message asking you to leave the page. Like this –
 |
| Blogger setting confirmation screen |
Please click ‘Leave Page’. Now you will be directed to Google webmaster domain verification page and the following screen will appear-
 |
| Domain nme provider method |
 |
| Godaddy domain screen |
 |
| DNS zone screen |
 |
| All domain screen |
 |
| Zone file editor screen |
 |
| Quick add screen |
Under Host put’@’ and copy the text string you received on Google Domain Verification page and paste it under under ‘Text Value’. You may leave the TTL as default.
Click 'Save Zone file' on Top Right or bottom left and follow instructions if any.
Now go back to Google webmaster Domain Verification page and click ‘Verify’.
You must receive congratulation message from google web master.
That all. You are done.
Google site verification, google-site-verification dns, google search console, google-site-verification meta tag example, verify domain ownership, google webmaster tools, google domains, google verification, How do I verify ownership of a Google domain, How do I get my blog verified by Google, How do I verify who owns a domain name, How do I verify domain ownership using DNS records.
